Create a JavaSketchpad Web Page |
  
|
Create a JavaSketchpad Web Page |
|
If this is your first time creating a JavaSketchpad illustration, start with a simple construction like a triangle.
1.Use Sketchpad to create or open a sketch containing the construction you want to show in a web page.
2.Resize the sketch window to be the size of your intended illustration on your web page. Adjust your construction so that it appears as you’d like your visitors to first see it.
The size of the illustration in your web page is the same as the size of your sketch window at the moment you saved the HTML file. Be sure to decrease the size of the window before saving unless you want very large web page illustrations!
4.Choose File | Save and save your document normally. This way you’ll have a saved copy of the sketch from which you’re about to create the web page.
5.Choose File | Save As.
Shortcut: Hold down Shift while displaying the File menu to turn Save As into Save As HTML.
6.In the Save As dialog box, change the file format or type to HTML/JavaSketchpad Document. Click Save.
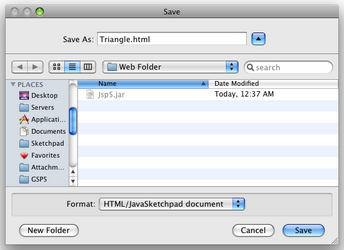
Sketchpad creates a new web page — an HTML file — describing the Sketchpad illustration. (Sketchpad also copies jsp5.jar, the JavaSketchpad applet, to the same folder it it's not there already.)
Note: Sketchpad cannot open HTML documents, so saving your document as HTML does not save your document in a way that Sketchpad can reopen. This is the reason you did a normal save in step 4 above.
7.Assuming all goes well, Sketchpad will ask if you want to preview the web page in your browser. Click Yes.
8.Your browser opens and displays the web page. The first time your browser opens a page containing JavaSketchpad illustrations, it may take a few seconds to load.
9.Once your illustration appears, drag its independent points to explore your construction. You’ve successfully created your first Dynamic Geometry web page!
See also: