| Show/Hide Hidden Text |

This Transform menu command constructs a rotated image of the selected geometric object(s).
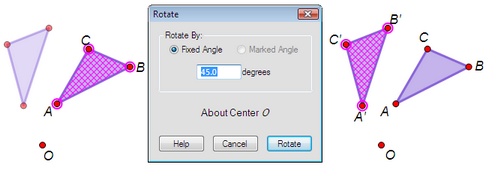
Sketchpad has both a Rotate Arrow tool and a Rotate command. When you use the tool, you rotate the original object. When you use the command, you create a new object — a rotated image of the original object.
You can rotate points, straight objects, circles, arcs, interiors, and pictures. You cannot rotate iterated images, and you cannot apply the Rotate command to loci, function plots, and other sampled objects. (However, you can use a custom transformation to rotate point loci, function plots, parametric plots, and sampled transformed paths.) |
Before choosing this command, you may want to mark a center point and mark an angle.
Mark a center point by double-clicking with the Arrow tool. If you rotate without first marking a center, Sketchpad will mark one for you.
To rotate objects:
1.Select the object(s) you want to rotate.
2.Choose Transform | Rotate. The Rotate dialog box appears, and a rotated image of your selections appears in the sketch.
3.Choose either Fixed Angle or Marked Angle, as described below.
4.You can click a point in the sketch to change the marked center, or you can click an angle marker or angle value to change the marked angle.
5.When you have chosen the options you want and entered any required values, click Rotate.
The rotated image appears.
Choose Fixed Angle to enter a fixed (numeric) angle of rotation using your sketch’s current angle units.
Positive angles result in counter-clockwise rotations, and negative angles result in clockwise rotations.
Choose Marked Angle to rotate your selection based on an angle you’ve specified using the Transform | Mark Angle command. This choice is disabled if you haven’t already marked an angle. However, if you want to use an angle marker or angle value that exists in your sketch but has not already been marked, click that value now to mark it.